Upgrading to a luxury, customized tile shower delivers style, value, and an invigorating bathing experience. With strategic design choices and quality installation, you can create a custom tiled shower that becomes the highlight of your bath.
This in-depth guide covers everything you need to know, from turning inspiration into plans to the complete installation process. Let’s get started designing your dream custom tile shower!
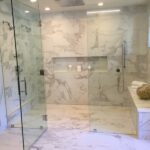
Envisioning Your Custom Tiled Showers
The first step towards an eye-catching custom shower involves imagining possibilities and setting goals. Home renovators approach tiled showers with diverse priorities in mind:
Overall Theme – Consider the emotions and ambiance you want the shower to evoke through materials and aesthetics. Soothing and airy? Bold and lively? Focus the style to guide choices.
Special Features – Would you enjoy a spacious built-in bench or niche shelving? Multiple showerheads? Accent strip tiles or intricate patterns? Establish must-have elements upfront.
Budget Reality Check – Custom means splurging on design liberties you love rather than needs alone. But keep budget expectations realistic regarding the full custom job cost.
Beyond purely functional considerations like layout, size, water pressure, and accessibility, put your personality and priorities into the visioning process. This filters options later as plans solidify.
Now let’s transform your shower dreams and desires into tangible design directions…
Developing Your Custom Tile Shower Design
Bringing a custom shower concept to fruition requires translating inspiration into concrete plans accounting for practical realities.
Settle on Overall Footprint
Factor in existing bathroom dimensions and layout along with standard shower sizes:
- Standard dimensions range 30-48 inches deep, 32-60 inches across.
- Small bathrooms may need narrow neo angle layouts as little as 32 x 32 inches.
- Larger master baths can accommodate huge walk-ins exceeding 5 x 5 feet.
- Remember to account for code minimums including 30 x 30 inches of floor clearance.
Choose a Door or Entry Approach
Custom showers allow flexibility when it comes to access and containment. Assess options:
- Frameless glass door for completely open walk-in access
- Partial glass partition with open entry on one side
- Curbless entry for barrier free roll-in access
- Curtain alternative for simpler water containment
Measure opening sizes to ensure comfortable ingress/egress.
Select Initial Materials and Finishes
Nail down tentative surface materials needing pricing quotes early like:
- Tile types and sizes
- Grout and accent tiles
- Stone and alternate surfaces
- Hardware fixtures and trims
- Lighting, glass, and shelving
- Grouting and sealing products
This gives direction for contractors to assess costs. But leave flexibility to adjust specifics during final design.
Map Out Slope and Drainage
Proper slope and drainage prevents leaks and water damage. Choices include:
- Center drains or discrete perimeter trench drains
- Linear or square drain grate styles and materials
- Drain elevation relative to the rest of the bathroom
- Pitch ratio to drain averaging 1⁄4 inch per 1 foot
Professional installers ultimately finalize drainage. But communicate preferences so the shower slopes discreetly yet effectively.
Set a Preliminary Budget
With initial shower dimensions, features, and finishes in mind, contractors can provide rough budget estimates on custom jobs. Costs vary based on:
- Tile, stone, and material grades
- Complexity factors like niches, benches, tile patterns
- Drainage needs and existing plumbing
- Accessibility and entryway options
- Local labor and contractor rates
Expect to spend $5,000-15,000+ on custom tile shower installation alone. The right pros balance splurging on design details you’ll enjoy against overspending.

Working with Tile Shower Professionals
Unless you’re an expert tiling contractor yourself, properly executing a luxury custom tile shower requires hiring pros. Master tilesetters, plumbing contractors, and designers collaborate to handle technical aspects while bringing your vision to reality.
Tile Installer or Contractor
The tile or bath contractor serves as project lead, coordinating subs like electricians and plumbers. Verify they specialize in custom showers versus general remodels. Expert skills translating designs into properly prepped and fitted tile surfaces are essential.
Assess their experience with materials you desire like large format tiles, intricate patterns, or specialty lighting. Judge quality of past custom shower work. Ensure licensing and insurance is active.
Designer
While optional, professional bathroom designers help make a custom shower cohesive. They address aesthetic elements like tile arrangements, trims, niches, lighting, and accessories for holistic style.
Some tile contractors offer complementary design consultations. Independent designers cost $50-$150 per hour but deliver beautiful coherence. Agree on scope and fees upfront.
Throughout the collaborative design process, lean on their talents while insisting on features important to you. This synergistic partnership yields rewarding results.

Key Custom Shower Design Decisions
Beyond initial planning, several pivotal design choices define your custom tile shower’s form and function.
Layout
Common configurations include:
- Neo-angle – Angled walls fitting into corners with spacious feel
- Curbless – No threshold for walk-in accessibility
- Bench – Built-in bench for seating or storage
- Quarter-round – Rounded back wall, semi-enclosed
- Half-moon – Combining rounded and angular walls
Weigh layout options against space, door position, and desired openness.
Tile Types and Materials
Myriad materials and tiles to consider with inherent pros and cons:
- Ceramic – Cost effective and easy to clean with classic styles
- Porcelain – Low absorption, durability, through-body color
- Mosaic – Small tiles forming intricate patterns with grout
- Glass – Eye-catching with heat resistance and staining risks
- Marble – Elegant yet softer and etching prone
- Granite – Harder and more resilient at higher costs
Larger tiles like 12” x 24” establish clean contemporary looks with less grout. Smaller mosaics allow creative flourishes.
Grout and Accent Tiles
Grout draws the eye. Contrasting grout colors against tiles make patterns pop.
Creative incorporation of accent tile bands or geometric deco tile inserts elevates styles further.
Professionals guide best grouting and accent approaches for the tiles you select.
Lighting and Accessories
Consider exterior-rated LED lighting to bask the shower safely in ambient glows. Niche shelving, grab bars, mirrors, and hooks add function.
A wall-mounted shower bench provides convenient seating. Just ensure proper waterproofing and drainage under the seat.
With strategic planning upfront and during the design process, you control the custom shower components fulfilling your wish list.

Custom Shower Installation and Construction Guide
Transforming shower designs into stunning reality depends on meticulous installation practices and sequence.
Demolition
If replacing an existing tub or shower enclosure, professionals first gut showers down to the bare studs.
This allows assessing integrity of walls, plumbing, electrical, etc. while maximizing custom layout flexibility.
Consider salvaging any existing reusable plumbing fixtures or supply lines if functional and properly placed.
Tip: Convert showers to curbless by raising perimeter lip thresholds flush with floor level.
Waterproofing
Contractors thoroughly waterproof surrounding surfaces using compounds like RedGard or liquid membranes before rebuild. Treat subfloors, walls, wooden framing, and backsides of cementboard panels.
Tip: Extend waterproofing a few feet outside immediate shower area for redundancy against leaks.
Construct Custom Base
Several base build approaches for custom showers exist:
- Prefab pan – Formed pans with integrated draining shipped to site
- Mortar bed – Cement foundation base sloped toward drain
- Subfloor – Existing flooring waterproofed with membrane
Cost, labor, and complexity varies. Choose option suiting layout and drainage approach.
Tip: Maintain access to plumbing and drains for maintenance later.
Cement Board and Framing
Cement backerboard fastened securely to stud framing provides a durable tile underlayment. Professionals determine necessary layers and widths.
Tip: Use tile backerboard screws into framing studs for strength.
Install Floor Tiles
Your tiler template cuts floor tiles first around drains and boundaries with exact razor precision. They test arrangements before professionally setting tiles into bonding mortar beds. Natural stone flooring requires extra prep and support.
Tip: Arrange floor patterns and orient entry tiles strategically early.
Shower Wall Tiling
With flooring complete, tile setters clad walls from bottom up. Cement backerboard mounted behind provides adhesion base for tile bonding mortar. Carefully fit tile edges and built-in recesses aligned plumb and square.
Tip: Avoid L-shaped corner tiles which crack over time. Opt for edge bullnose finish tiles instead for rounded corners.
Grout and Seal
Grout fills joints between tiles with water resisting compounds built for wet environments and traffic once mortar cures completely. Match grout spacing and color to tile tone and format aesthetics.
Apply premium sealants ensuring water, grime, and dirt won’t penetrate porous grout or natural stone. Re-seal annually.
Tip: Avoid staining grout as you tile by wiping excess grout off tile faces with barely damp sponges.
With solid design principles, intentional materials selection, talented builders, and proper techniques and sequencing, your ultimate vision will transform into a functional tile artwork to enjoy for decades.
Now that you know the full scope of the custom tiled shower process from inspiration through installation, it’s time to focus ideas and get those creative juices flowing! Use the knowledge here combined with our photo idea galleries to craft your own signature shower.


Share This Article
Choose Your Platform: