HYDRO-BLOK Shower System with Low Profile Pan Installation Guide
Before Installing your HYDRO-BLOK Shower System
This installation guide is to be used exclusively for the installation of HYDRO-BLOK Low Profile Shower Pan systems. Surfaces must be structurally sound, stable, rigid, and clean prior to installation. Following TCNA standards for tile installation, the deflection of the substrate must not exceed L/360, = to ¼” in 10’. HYDRO-BLOK Wallboard is to be installed on maximum 16″ stud spacing. Proper backing is required in the corners per typical details. For proper backing support at the connection of the Drain and Shower Pan to Wallboard, a minimum dimensional 2×4 bottom plate (1-1/2″ high) is required. Add additional backing if necessary
Installation Tools and Materials Required
• Drill/driver with #2 Philips screwdriver bit
• Circular saw with standard wood blade for cuing the pan
• Tape measure, razor knife, and carpenter pencil or marker
• Level, straight edge, and square
• Modified Thinset with 3/8″ minimum notch trowel, mixer, bucket and sponge
• HYDRO-BLOK Joint Sealant
• Sausage gun or standard caulking gun for HYDRO-BLOK Joint Sealant
• Cleaning supplies. We recommend citrus wipes and paper towels/rags
Step 1: Positioning the Drain Pipe
Using appropriate tools, remove a 5″ to 6″ wide section of the subfloor entered around the drain pipe location (round or square). Have a qualified plumber install a 2″ ABS drain pipe so that the top of the pipe is flush with the top of the subfloor where the pan will be installed. The drain pipe must have a minimum 1″ of clearance on all sides and be securely fastened below the subfloor so that it will not move downwards under load. After cutting, clean off any burrs on the 2″ pipe.

Step 2: Installing the Low Profile Shower Pan
Included in your HYDRO-BLOK Shower Pan box are:
a) Drain Assembly with Stainless Steel Grate


Step 3: Installing the Low Profile Shower Pan – continued
1. Prepare and clean the location where the HYDRO-BLOK Shower Pan will be installed. Measure from center of drain pipe to the perimeter of the pan area and transfer those dimension to the HYDRO-BLOK Shower Pan. If a HYDRO-BLOK Shower Curb is to be installed with the Shower Pan, ensure the curb is accounted for in any measurements.
2. Deduct 1/8″ on all sides (Fig. 2) to allow for shim space and position the Shower Pan into place. The Foam Packaging Ring protecting the Drain Hub may be inserted into the Pan Collar to assist indexing the center of the opening for pulling your measurements.

3. Cut the Shower Pan and any Shower Pan Extensions to size using a circular saw. See Appendix A for details on how to remanufacture the factory notches.
4. Dry fit the Shower Pan on the subfloor. Ensure all sides of Pan fit comfortably to within 1/8″ of the perimeter within the space. DO NOT try to force the shower pan into its location. Doing so may damage the pan and make installation of the wallboard difficult.
5. Remove the Rubber Ball Seal from the Drain Hub and dry fit the Drain Hub into the Shower Pan Collar to ensure a proper alignment with the drain pipe (Fig. 3). The Drain Hub can be adjusted laterally up to ¼” in any direction to assist in making a proper connection.

6. Apply modified thinset to the subfloor with a minimum 3/8″ x 3/8″ notch trowel.
7. Set the Shower Pan into place and carefully step on pan in all areas to embed the Shower Pan into the thinset.
8. Apply two 3/8″ beads of Joint Sealant on Pan Collar as shown in Fig 4
9. Insert Rubber Ball Seal in to Drain Hub ensuring the Down arrow is pointed to the bottom (drain pipe side) of the Drain Hub.
10. Insert the supplied Pipe Puller at an angle (fig. 4) until the handle reaches the pipe, then tighten by straightening the handle to a vertical position

11. Press the Drain Hub over the drain pipe while pulling up on pipe puller (Fig. 5) ensuring the Drain Hub and drain pipe are fully seated to within ¼” of each other. NOTE: The rubber Ball Seal can accommodate up to a 5-degree angle in the drain pipe in any direction
12. Use 4 HYDRO-BLOK Wallboard Screws (optional #8 or #9 backerboard/wood screws with a minimum length of 1-1/4”) to attach the Drain Hub into place on the subfloor within the Shower Pan Collar. Do not over tighten screws.
NOTE: For concrete floors where the pipe is fixed and does not have any movement, it is not necessary to screw down the Drain Hub. The Ball Seal will hold the Drain Hub into place once fully set onto the drain pipe. Use an ample amount of Joint Sealant to fill the screw holes in the Drain Hub and tool flat.
13. Remove the Drain Puller

14. Apply HYDRO-BLOK Joint Sealant to top seam between the Shower Pan Collar / Drain Hub connection and the screw holes and trowel flat with a putty knife as shown in Fig. 6.

Step 4: Installing the HYDRO-BLOK Wallboard
1. Use a utility knife with a fresh blade to cut the first row of ½” Wallboard around the entire perimeter of the shower area. Measure and cut the back wall at full width and then size and cut the side parts. Dry fit all Wallboard once cut to ensure proper fit before installation.
NOTE: This step allows for a more efficient installation once you start using the HYDRO-BLOK Joint Sealant and adhering the parts together. On a typical climate day, you have approximately 20 minutes of open working time with the Joint Sealant. Having the parts pre-cut will allow you to complete the Shower Pan joint and first row of Wallboard installation within this time frame.
NOTE: Wallboard must always be installed before installing a HYDRO-BLOK Shower Curb.
2. Apply a 1/2″ continuous bead of HYDRO-BLOK Joint Sealant inside the perimeter channel created by the Shower Pan at the rear wall plate (Fig. 7).

3. Place the Wallboard into the channel and firmly compress into the Joint Sealant. Use a level and tape measure to ensure the board is fully seated in the channel (minimum 3/16″).
4. Fasten the Wallboard to the studs using HYDRO-BLOK Screws and Washers as shown in Fig. 8. Place the first row of Washers 12″ up from the bottom of the Shower Pan, and then add Washers every 12″ vertically on minimum 16″ stud centers (Fig. 9). Drive the Screws/Washers in flush or just past flush of surface of the Wallboard.
NOTE: Screws/Washers that land on/at a seam with another Wallboard section may span the boards, so only 1 screw/washer is required at these locations (including intersections).
5. As shown in Fig. 10 use the HYDRO-BLOK Corner Putty Knife to smooth out the excess HYDRO-BLOK Joint Sealant from the seam between the Shower Pan and Wallboard. Any excess Sealant removed can be spread to cover the Screws/Washers. Continue the Wallboard installation for the remaining first row and then finish the Shower Pan to Wallboard seam connection (see below).

6. Apply a ½” continuous bead of Joint Sealant in the channel on the side of your Shower Pan at the bottom plate and another bead running vertically on the end Wallboard so that when installing the side Wallboard it can be pressed firmly into the Shower Pan channel and against the rear Wallboard creating a continuous bond and seal (see Fig. 13).

7. Place the side Wallboard approximately 1″ from the rear Wallboard and compress it into the shower pan channel and towards the rear Wallboard until seated firmly. Use a level and tape measure ensure it is properly set in place.
8. Attach the Wallboard to the studs with Screws and Washers and tool the Shower Pan to Wallboard joint using the same method described in Step 5 above. Continue this process until the first row of Wallboard is installed
Step 5: Finishing the Wallboard and Pan Seam Connections
1. To finish the joint and seam connections between the Shower Pan and Wallboard, first apply a final bead of ½” HYDRO-BLOK Joint Sealant on all joints and seams. Use a HYDRO-BLOK Corner Putty Knife for all 90 degree joints and the standard putty knife for all flat seams. Smooth out the Joint Sealant and ensure there is at least 1″ on either side of any joint or seam. Any excess sealant can be used to cover Screws/Washers.
2. Cut the supplied 2″ Mesh Tape to cover all joints and seams to within approximately 3″ of the corners as per Fig. 11. It is not required to install the mesh tape all the way to the corner, or up vertical joints or seams.

3. Press the Mesh Tape into the existing Joint Sealant, working from the center out, smoothing any wrinkles.
4. Apply an additional continuous ½” bead of Joint Sealant on top of the Mesh Tape and smooth out again with the putty knives to fully cover the Mesh Tape (Fig. 12). Excess Joint Sealant from this process may be used to cover Screws/Washers.
5. Perform a final check of all joints and screws/washers to ensure they are completely covered in Joint Sealant and there is at least 1″ of Joint Sealant on either side of any joint or seam.

Step 6: Continue Installation for the Remaining Wallboard
1. When placing a new piece of Wallboard on top of an existing piece, apply a ½” continuous bead of Joint Sealant along the entire edge of the lower board. Press the new upper Wallboard firmly down into the Joint Sealant and hold against the studs. Install a HYDRO-BLOK Washer and Screw 12″ up from the seam close to the to center of the Wallboard to provide initial support. If the upper Wallboard is connecting to another previously installed Wallboard at the corner, first apply a ½” continuous bead of Joint Sealant to the existing board vertically at the corner as well and press the Wallboard being installed into the bottom and side beads of sealant at the same time.
2. Install Washers and Screws along the seam at the stud locations and at 12″ vertical intervals to secure the board to the studs. Use a HYDRO-BLOK Standard Putty Knife to smooth out the excess Joint Sealant along the seam, using it to cover the seam as well as the Screws and Washers. Ensure all seams have a minimum of 1″ of sealant on each side of the seam. Apply additional Joint Sealant as necessary
3. To finish the joint and seam connections, apply a final continuous bead of ½” Joint Sealant on all joints and seams. Use a HYDRO-BLOK Corner Putty Knife for all 90 degree joints and the Standard Putty Knife for all flat seams. Ensure there is at least 1″ of Joint Sealant on either side of any joint or seam. Excess sealant can be used to cover Screws/Washers.
4. Perform a final check of all joints and screws/washers to ensure they are completely covered in Joint Sealant and there is at least 1″ of Joint Sealant on either side of any joint or seam (Fig. 14).

Step 7: Installing a HYDRO-BLOK Shower Curb
1. If a Shower Curb is to be installed, measure the opening and cut the Shower Curb 1/8″ less. The Shower Curb can be cut with a wet saw, chop saw, circular saw, or hand saw. Ensure that any cuts are square and neat.
2. Dry fit the Curb to ensure that the notch in the Shower Curb matches up with the notch on the Shower Pan. If necessary, modify the Curb by increasing the notch depth ¼” or removing ¼” off the bottom, depending on your needs. Refer to the sticker attached to your Shower Curb for clarification if needed.
3. Apply modified thinset to the floor where the Shower Curb sits with a minimum 3/8″ trowel, keeping the thinset ½” away from the foam edge of the Shower Pan. Using the flat side of the trowel, coat the exposed foam on the bottom of the Shower Curb with thinset (Fig. 15).

4. Apply a ½” continuous bead of Joint Sealant to the Shower Pan notch and on the lower vertical Shower Pan perimeter surface (Fig. 15).
5. Apply a generous amount of Joint Sealant to the Wallboard face where the Curb will be located and each end of the Shower Curb as shown in Fig. 16.
6. Fully compress the Shower Curb into it’s seated position at an angle to avoid mixing the thinset and Joint Sealant. Use a level or square to slightly angle the Shower Curb to the inside of the shower to allow water to drain.

7. Use the HYDRO-BLOK Corner Putty Knife to smooth out the excess Joint Sealant from the seam between the Shower Pan and Curb and install 2″ mesh tape as per the Shower Pan to Wallboard seams. Place an additional small piece of mesh tape at the top of Shower Curb to Wallboard joint. Any excess Joint Sealant can be spread to cover the Screws/Washers (Fig. 17).

8. HYDRO-BLOK Joint Sealant will cure under water so you can immediately fill the shower for flood testing. Use the supplied Foam Test Ball to block the drain opening during flood testing. After approximately one hour at room temperature HYDRO-BLOK Joint Sealant will skin over and thinset for Tile or Stone can safely be applied.
NOTE: The supplied screw hook can be screwed into the Foam Test Ball to act as a handle for inserting and removing the ball from the drain opening when flood testing. DO NOT insert the supplied Foam Test Ball more than half way into the drain pipe without using the supplied screw hook or it may be difficult to remove.
Step 8: Waterproofing the Remaining Floor for Curb-less Installations
NOTE: For Curb-less showers, the remainder of the floor in the bathroom must be waterproofed. This includes a waterproof transition to the walls and up the walls at least 2″.
1. Install ¼” HYDRO-BLOK Board on the floor and ½” HYDRO-BLOK Board for the wall base. An alternate waterproofing method may also be used, for
example, when installing a heat membrane mat for heat wire (follow all manufacturers instructions).
NOTE: When installing 48×84, 60×84, and 36×72 Offset Drain Pans, ½” of tile backer is required on the bathroom floor if your pan recess is ¾” to achieve a flush transition. These HYDRO-BLOK Low Profile Shower Pans are 1-1/4″ thick at the perimeter versus the standard 1″ thickness due to the overall length of the required slope.
2. Remove the wallboard at least 2″ up the wall in the rest of the bathroom, or slightly shorter than what will be covered by the base finish.
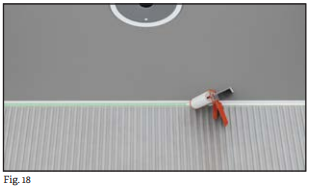
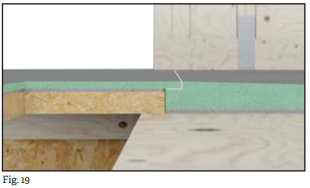
3. Apply a continuous bead of HYDRO-BLOK Joint Sealant along the Shower Pan notch (Figs. 18 & 19).
4. Apply modified thinset to the subfloor with a ¼” notch trowel staying 1″ away from the Pan. Trowel marks should be straight and running perpendicular to the pan to allow air to escape (Figs. 18 & 19).
5. Slowly lower the ¼” HYDRO-BLOK Board into the Joint Sealant at an angle to avoid mixing with the thinset and then compress against the Shower Pan. Walk on the HYDRO-BLOK Board to fully set it into the thinset.
6. Fasten the HYDRO-BLOK Board to the floor using HYDRO-BLOK Screws and Washers with a maximum spacing of 18″. Install enough HYDRO-BLOK Board at this time to cover the entire length of the Shower Pan. When installing additional HYDRO-BLOK boards, apply a bead of Joint Sealant to the board on the floor and then compress the next board into it at an angle while slowly lowering into place to avoid mixing the thinset and Sealant. Fasten to the floor with HYDRO-BLOK Screws and Washers as described.
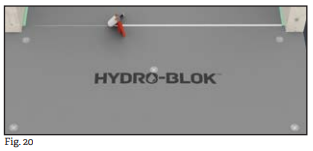
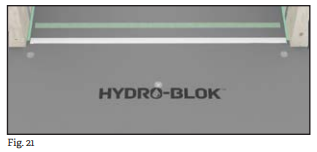
7. Apply a ½” bead of Joint Sealant to the seam between the Board and Shower Pan as shown in Fig. 20 and trowel the Joint Sealant flat with the Standard Putty Knife. Cut a strip of the included 2″ mesh tape to within 3″ of the ends of the Shower Pan and press the Mesh Tape into the existing Joint Sealant (Fig. 21) working from the center out with the Putty Knife, smoothing any wrinkles
8. Apply an additional continuous ½” bead of Joint Sealant on top of the Mesh Tape and trowel flat to fully cover the Mesh Tape. Mesh Tape is not required for the seams connecting the ¼” Board together on the floor, only where the HYDRO-BLOK Boards meet the Shower Pan.
9. Install ¼” HYDRO-BLOK Board on the rest of the floor as described, making sure to pre-apply Sealant to all seams and cover them with a minimum of 1″ of sealant troweled flat on each side. Excess sealant can be used to cover Screws/Washers.
10. Using ½” HYDRO-BLOK Wallboard, cut strips to fill in the gap between the ¼” HYDRO-BLOK Board on the floor and the existing wallboard. Apply a continuous ½” bead of Joint Sealant on the floor at the base of the wall, then insert the bottom of the ½” HYDRO-BLOK Wallboard at an angle into the sealant and press against the studs. Insert a HYDRO-BLOK Screw and Washer at each stud location.
11. Apply an additional ½” bead of Joint Sealant along the bottom joint and tool flat with the Corner Putty Knife. Apply a bead of Joint Sealant to all vertical seams between the HYDRO-BLOK board as you continue the installation. Mesh Tape is not required for any of these seams or joints.
12. Perform a final check of all joints and screws/washers to ensure they are completely covered in HYDRO-BLOK Joint Sealant and there is at least 1″ of Joint Sealant on either side of any joint or seam as per Fig. 22.

Step 9: Installing the Adjustable Grate
1. Flip the green Construction Plug upside down to access the Wax Cup. Remove the Wax Cap and use your finger to apply the wax to outer edge of the Construction Plug (Figs. 23 & 24). The wax is a release agent allowing the Construction Plug to easily separate from the grout after the tile installation is completely grouted.
2. Insert the Construction Plug into the Grate Frame and screw in the Leveling Screws until snug.

3. To have the Grate installed centered on the pipe location, insert the three Centering Tabs into the Construction Plug as shown in Fig. 25. To adjust the Grate off-center to assist with tile layout, remove the Centering Tabs to allow for adjustment up to ½” off center in any direction.
4. The Frame with attached Wings is set up from the factory to flush out with installed tile 3/16″ (including thinset).

5. For thicker installations of tile up to ¾”, snap off the Frame Wings (Fig. 26) and use the Leveling Screws in the Construction Plug to set the proper height flush with your tile. The Grate Frame Riser should be used under the Grate Frame for installations from ½” to ¾” to protect the drain pipe area from thinset and grout during tile installation (Fig. 27).

6. The Frame Wings are recommended to be reinstalled to fill the recessed area in the Pan Collar (especially recommended with small mosaics).
7. Place a few dabs of sealant under the Frame Wing fillers and tack into place. Do not use an abundance or continuous bead of sealant as the Wings must allow water to weep to the drain pipe.
8. If the Grate Frame was not installed centered then one of Frame Wings may need to be trimmed so it fits in the Pan Collar properly.
9. Install tile and finish all grout joints including the joints around the Construction Plug.
10. Allow the grout to cure overnight and then remove the four Leveling Screws in the Construction Plug. Re-install one screw in the center threaded area and pull upward to assist in removing the Construction Plug,
11. Cut away threaded corners on the Grate Frame.
12. Install the Included HYDRO-BLOK Stainless Steel Grate (Fig. 28).

For custom Grate options, visit www.ebbe-america.com and view the ELP Series. These may be ordered online directly from ebbe. At any time, you may simply remove the standard HYDRO-BLOK Grate and install an ebbe ELP square grate
APPENDIX A – Remanufacture the Factory Low Profile Pan Notches
Using a circular saw with a standard wood blade, set the blade depth to 1/4″ and make a cut through the cement surface on the top of the Pan ½” in from the new edge as shown in Fig. 29.

Use a circular saw or straight edge & utility knife to make a ½” deep cut through the foam on the edge of the Pan, 3/4″ up from the bottom of the Pan as per Fig. 30.

APPENDIX B – Installation Requirements for Mosaic Tile on the Pan
When installing tile or stone that is smaller than 2″x2″, a high performance grout with a minimum 3500 PSI compressive strength and meeting ANSI 118.7 or epoxy grout 118.3 must be used to comply with the HYDRO-BLOK warranty. These products are commonly used and readily available.
APPENDIX C – Water Testing the Curbless Pan
Cut 5″ tall strips of ½” HYDRO-BLOK Wallboard and use HYDRO-BLOK Joint Sealant to temporarily seal them to the HYDRO-BLOK Pan and Walls across the opening. Provide additional support to the boards to prevent them from flexing out into the room due to the pressure of the water inside the Shower Pan. The supplied screw hook can be screwed into the Foam Test Ball to act as a handle for inserting and removing the ball from the drain opening. Once test is completed cut and remove the temporary HYDRO-BLOK Boards using a long razor knife or multitool at a parallel angle with the Pan and Walls.
NOTE: DO NOT insert the supplied Foam Test Ball more than half way into the drain pipe without using the supplied screw hook or it may be difficult to remove.





Share This Article
Choose Your Platform: